

Inspecting elements
A floating toolbar sits at the bottom of the canvas with four modes — Navigate, Select / Inspect, Comment, and Draw — plus a drag handle to reposition it and a chevron for more actions. Click Select / Inspect, then click any element in the preview to select it. Once an element is selected, the left panel switches from Components to Editor and shows:- The element’s tag and component name (for example,
h1·Hero/title), with a pinned link to its source file and line (hero.jsx · Line 38) - Editable Text Content
- Text properties — size, weight
- Style (bold, italic, underline) and Alignment
- Color
- Appearance — background and border color
- Layout — display and positioning
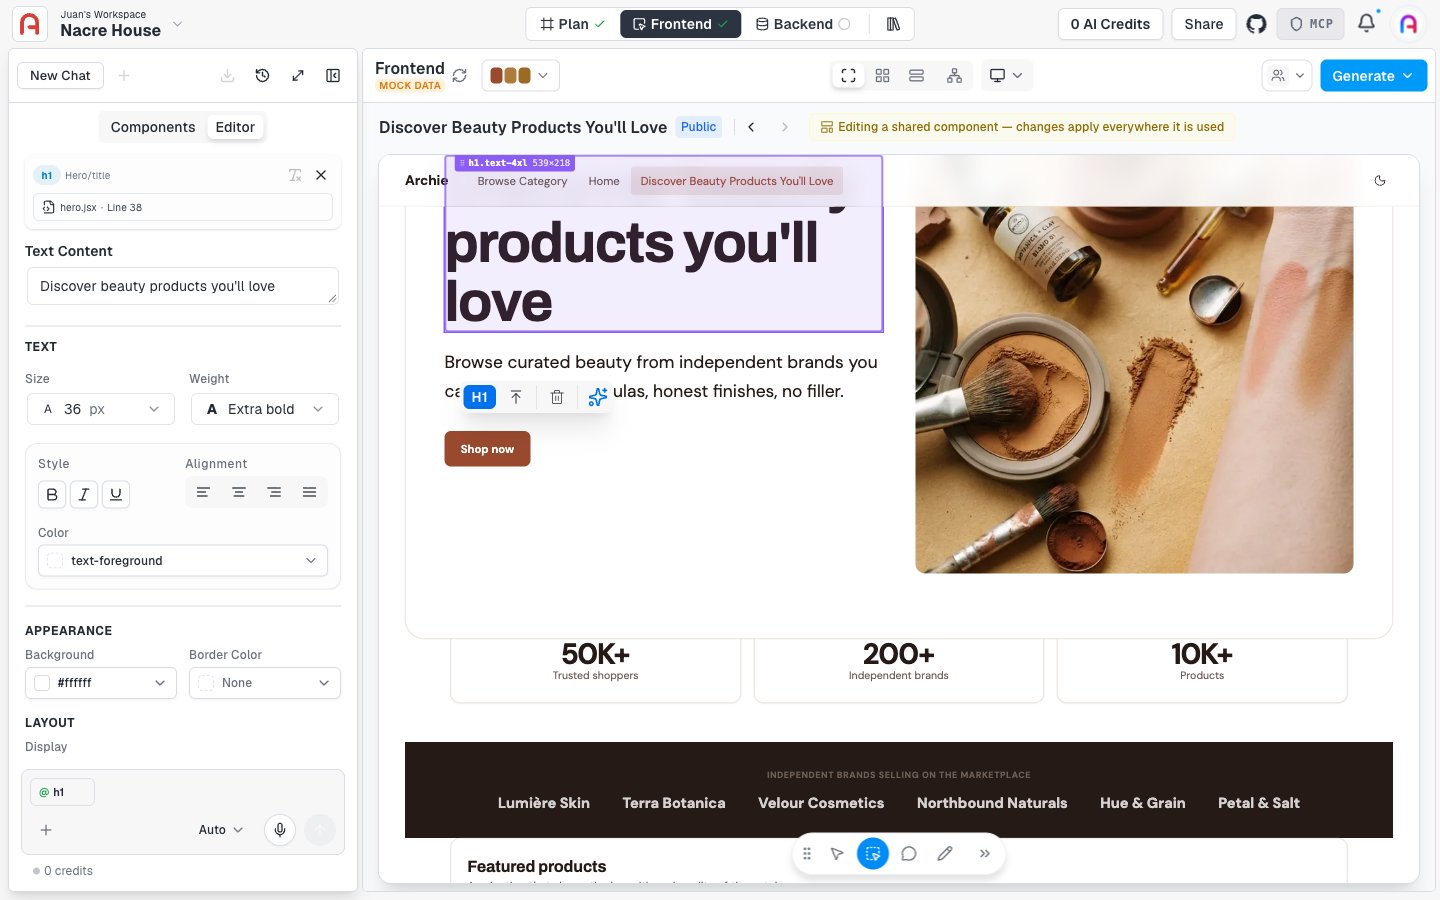
Editing an element
With an element selected, a small floating toolbar appears on the element itself (its tag, select parent, delete, and a sparkle icon for prompt mode), and you can:- Edit text directly in the inspector
- Adjust styling (color, padding, font size) via property controls
- Replace media for image and video elements
- Open the source file for the component that produced this element
When to use which modality
- Visual editor — small visual changes, copy edits, swapping images, tweaking spacing
- Talking to Archie — multi-step or cross-file changes, logic adjustments
- Plan — adding modules, changing user types, swapping integrations, restructuring the app
Editing components vs. instances
Some changes apply to a single instance of a component (the dashboard page’s button), and some apply to the component itself (every button everywhere). The inspector shows which scope you are editing. Switch between Instance and Component in the inspector header. Editing the component cascades to every place it is used. Useful for design-system-level edits. Editing only the instance is useful when one location needs to differ from the rest.Persistence
Edits made through the visual editor persist when they apply to component-level state and to instance-specific overrides on routed pages. The IDE shows the same files updated. When you push to GitHub, the edits travel with the code.What the visual editor cannot edit
- Server-only or background elements (computed in middleware, hydrated late) — not directly inspectable. Edit those in the IDE.
- Logic-heavy components where the visual element is generated dynamically — use the chat or IDE.
- Backend-side surfaces (database schema, API routes) — those live in the Backend console.